It was a birthday cake kind of weekend.

You’d think I’d be busy enough with food while working as a pastry chef in a restaurant, but clearly that isn’t the case. Going from being covered in flour at work, I come home to get covered in powdered sugar. “You have flour on your face,” is a comment I receive regularly at work. “The day must end in Y!” is my typical response. They don’t always tell me though, and sometimes I’ll end up going around half the day with flour smeared all over my face and no one telling me. Sometimes I think the other chefs leave me hanging on purpose for their own personal entertainment. Touche, fellas.

One friend’s husband turned 40, and she wanted a birthday cake with humor and personality. She sent me a pic of something someone else had made that was on the internet, and the concept was filled with sarcasm. Naturally, I loved it.

fire cake

The firetruck even lights up and makes noise. I made sure to tell my friend to push the buttons when they lit all the candles for the full effect of the cake.

Apparently though, it wasn’t as funny as I thought it was, considering I had to EXPLAIN the humor behind it to both my dad and my husband. The conversations were almost identical.

“Is he a firefighter?”

“Uh, no. The firetruck is on call because there are so many candles on the cake. You know, because he’s 40. Over the hill. Because there are SO many candles. Get it? Do you not get it? Come on, you HAVE to get that. It’s funny!”

“Yeah, I get it.”

Men…

The other cake I made was for a set of adorable twin girls who were having their first birthday party. Mom wanted pink roses on their cakes, and sent me a picture of the faded color rose cake she found. The faded colors weren’t as obvious in the one I made, but if you look closely you can see that the top shade is lighter than the bottom.

FullSizeRender

Every time I walked through the kitchen after they were finished, I’d stop and stare.

“They’re just so pretty,” I’d say out loud. No one was listening.

table shot

(Photo by Angela McCall, Happy Clicker Photography)

These little boards that Mom’s friend made were so cute and creative to go along with the cakes that have little tidbits of info on them.

smash cake

(Photo by Angela McCall, Happy Clicker Photography)

Cutest. Smash cakes. Ever.

baby girls

(Photo by Angela McCall, Happy Clicker Photography)

But the smash cakes aren’t nearly as cute and sweet as the birthday girls. They did a great job smashing them. Happy birthday, girls!

Poop Emoji Cake

Over The Hill birthdays give you the opportunity to go over the edge with funny gifts. Which is why this is one of my favorite sections in a party store to look at, because there’s usually something good enough to make me laugh out loud. This cake had the same effect.

Two sisters-in-law and my husband all turned 40 within one month of each other. What’s crazy about this is that my brothers are 6 and 9 years older than me, but we ALL married spouses born in 1977 within a month. All of them also have dark hair and blue eyes. Weird. Well, we’re weird, so it does make a little bit of sense.

Two days before a dinner gathering around the last birthday, my mom asked if I was available to make a cake. The idea of this cake had actually popped in my head a few days before, thinking of how funny it would be to make this.

Coincidence?

I think not.

This cake was meant for my sister-in-law. They’re soulmates.

If she did have a problem with it, we could always use the excuse, “Well, you married Michael, so we knew SOMETHING was wrong with you.”

She’s from New Jersey and is always willing to give you a very honest answer…even if you may not like that answer.

“Tracy, how did you like this dessert?”

“It was cheesecake. Eww.”

That’s when I knew something was wrong with her. Cheesecake is da bomb dot com, and I threatened to strap her up in a straightjacket and throw her in a padded room. She shrugged her shoulders and smiled.

Originally, we were going to get together at their house to grill out for dinner, but she preferred to go out to eat. When my brother told me this, I started laughing.

“So, I have to bring the cake in the restaurant?”

“Yeah…is that a problem?” he asked.

“No (starting to laugh hysterically), it’s not a problem.”

He had NO idea what the cake looked like.

“Is it a family friendly cake?” he asked.

“Um, yes?”

I laughed out loud for the next few hours, imagining walking through a very busy local restaurant with this cake. This was going to be fun.

We pulled up in the parking lot, and I turned the cake to face out so everyone could see it clearly. As we were getting out of the car, I saw a couple of ladies with their kids standing on the sidewalk. They were chatting away, until one of them saw the cake. She stopped mid-sentence, “Oh my gosh! Look at that cake! That is hilarious!” The lady she was chatting with turned and starting laughing.

This continued as we walked through the restaurant, and people started taking pictures of it before, during, and after dinner. I saw a few people roll their eyes, but the majority of people enjoyed a good laugh at this crappy cake.

poop-emoji

The top tier was made in a doll cake pan, and is a dark chocolate cake packed with mini chocolate chips, covered with chocolate icing (of course). The eyes, mouth, and letters are made out of fondant. The bottom tier was a 2 layer 9 inch pumpkin cake with cream cheese icing. I decided to make two of the birthday girl’s favorite cake flavors since she is officially over the hill.

Happy 40th Birthday, Tracy! You’re old as crap!

Sesame Street Birthday Party

Some days, it feels like the days and weeks drag on, and then… BOOM! My baby boy turns 2. This all goes along with my cousin’s perfect description of having young kids, “The days are long, but the years are short.”

He’s not 2 weeks old.

Not 2 months old.

TWO YEARS OLD.

Where has the time gone?

I’m sure the mothers whose babies are turning 40 would snort at me because I have NO clue what it’s like for time to go by so quickly. On my birthday last year, my mom told me how she just can’t believe that her youngest baby is having her 7th anniversary of turning 29. Fine, maybe it’s me who refers to my birthdays as anniversaries these days, but that’s not the point. The point is that she remembers when I was a cute baby. A curious child. A sarcastic tween. An incredibly moody teenager. A partying college kid.

When my daughter’s 7th birthday rolls around later this year, all of the same feelings will happen again. It’s a continuous cycle that happens multiple times a year, each time my husband and I looking at each other and saying, “They’re growing up SO fast,” with pure amazement like neither one of us has already said this 100 times before, even when it’s just five minutes earlier.

We also said this last year at his Pirate First Birthday Party we threw for him. Honestly though, getting through that first year is a major accomplishment, so you better believe there was a big party. “Who serves alcohol at a kid’s party?” my brother asked as I passed around a special cocktail to some of the adults. “I’m not serving the kids alcohol!” I yelled at him.

This year was more low key. In fact, the only person who wore anything relating to Sesame Street was me in my Cookie Monster t-shirt… Because Cookie Monster is AWESOME. I even made Cookie Monster Cupcakes a few years ago because he’s so awesome. My cupcakes were in the March 2017 edition of  Story Monsters Ink magazine because you can’t go wrong with Cookie Monster. Should I say Cookie Monster and awesome again in the same sentence? COOKIE MONSTER IS AWESOME. Moving on.

sesame-street

This year’s cake was MUCH smaller than last year, but it served its purpose…

To look ridiculously cute and fill our bellies with sugar so that we could all sugar crash later in the day. Mission accomplished.

This is a 4 layer 10 inch round Blue Velvet cake. What? Blue Velvet? What the heck is that? It’s Red Velvet cake with blue food coloring instead of red. Yes, you CAN do that. It’s covered with cream cheese icing. I ordered the Elmo and Cookie Monster cake toppers from Amazon, made the 2 out of chocolate using a chocolate mold and lollipop stick, and made the rest of the decorations out of fondant.

The birthday boy loaded up on bubble toys. I don’t think I have EVER seen so many bubble toys, and he loves every single one of them. They catch his attention for about two whole minutes before he moves on to something else, only to return to the bubbles thirty seconds later. The attention span of a toddler is always entertaining, and you never know how long it will last.

Maybe next year he’ll understand Einstein’s Theory of Relativity, but this year he’s happy with bubbles.

I’m not 19 anymore, and it shows.

Well, at least physically I’m not. Sometimes it’s fun to be a goofball- minus the obnoxious, totally clueless life perspective from when I was 19. No, I’m not saying ALL 19 year olds are like this, just reflecting on so many of the dumb things I said or did 17 years ago. There are too many to list.

No dwelling on past mistakes though, let’s talk about the physical aspect of it.

Fine, I’ve had two kids… and after that second kid, it was even harder to get back into shape and lose the baby weight (I’m still technically 20 pounds heavier than pre-pregnancy weight). You know what though?

It doesn’t matter.

What MATTERS is how out of shape I FEEL.

At the age of 19, I could exercise for one hour a day and eat WHATEVER the hell I wanted. The result? A flat tummy with lines. My diet? Bagels smothered with butter, cinnamon and sugar, Capri Suns, burgers and fries, chips, Hamburger Helper (don’t judge, we didn’t know how to cook back then), soda, pizza, and anything else unhealthy you can think of. I had a metabolism on steroids.

Well, things change.

Popping in an exercise video just five years ago and getting back into really good physical condition would take less than two weeks. These days, it feels like it takes a damn year.

Oh, and the injuries. In the past year, I’ve had a sprained ankle, sprained wrist, and strained hip flexor. How? I have NO friggin’ clue. Must be age related, and getting back into those workouts while trying to nurse a minor injury makes it even more fun.

It’s like a sloth trying to do jumping jacks during a T25 workout.

Seriously.

Modified exercises? Please. You know the girl who does the modified exercises is still in amazing physical condition and it’s a cake walk for her. Speaking of cake…

I work with food.

Not diet food.

PASTRIES.

BREAD.

DESSERTS.

PASTA.

Granted, the foods I make are for the customers and I don’t eat much of them, but I’m still surrounded by some of the most succulent aromas from the incredibly talented chefs I work for. Did I mention the food is AH-MAZING?? “I think I’ll have a salad for lunch.” The day may start out with those intentions until the “not-diet-food” is staring at me from across the kitchen. Sending its fumes over to my nostrils. It’s a conspiracy. Especially when the stomach starts singing that it’s hungry and the chefs make a family meal of hot pasta, freshly made sauce, and oven roasted chicken wings. It’s just not fair.

Time to compromise. It may take longer, but the feeling of being physically fit and having more energy to do pretty much everything is worth those 25 minute workouts. Forget the pounds, I refuse to watch everyone else around me indulge in amazing food while I stand by and say, “No, I’m not allowed to eat.” Most of what I eat is healthy, but I’m not missing out on dessert and wine if it’s not necessary.

I can deal with having a muffin top if being able to move around like a kitchen ninja is fueled by those workouts.

Compromise fulfilled.

I put my family in a diabetic coma over the holidays.

Do you find yourself in charge of making something in particular for the holidays? I’m usually in charge of desserts.

No complaints here.

Since none of these calories count, here was the opportunity to really go overboard.

My mother-in-law asked if I could make something for their annual Christmas lunch where all of us get together. Does an alligator pee in a swamp? Of course.

But, what to make? The family LOVES cheesecake, and I knew there would be over 30 people at the gathering and one cheesecake won’t cut it. So what do you do in a situation like this?

Make two cheesecakes.

And a cake.

And two types of cookies.

And another cake.

What about my side of the family for a Christmas gathering? Several people on my side are weirdly picky about what they like, so something that will easily make everyone happy is the way to do it.

img_4428

So, here’s the Christmas dessert lineup to stuff our families like Hansel and Gretel:

img_4440

Chocolate Oreo Cheesecake:  rich, chocolate cheesecake with an Oreo crust and Oreo chunks packed throughout the cheesecake, topped with chocolate ganache, fresh whipped cream and a mini Oreo cookie.

img_4439

Tiramisu Cheesecake:  coffee cheesecake with a Nilla wafer crust, ladyfingers dipped in coffee and kahlua, and a mascarpone-cream topping with sprinkled cocoa.

Boston Creme Pie:  two layers of fluffy vanilla cake filled with vanilla pastry cream, covered with chocolate ganache.

Red Velvet Cake:  two layers of moist red velvet cake smothered with cream cheese icing.

Chocolate Chip Cookies:  thick, soft, and chewy chocolate chip cookies. No further explanation needed.

White Chocolate Peanut Butter Ritz Cookies:  two Ritz crackers sandwiching a thick layer of creamy peanut butter, dipped in white chocolate.

We had to make sure we saved chocolate chip cookies for Santa. He’s so needy.

The only promise I can make right now is to avoid eating any more desserts…for a couple days. I hope everyone had a wonderful Christmas!

The Cleaning Fairy leaves Crème Brulee when she visits.

Imagine going to bed at night, sleeping 8 hours straight, and waking up to a clean house. All the clutter is gone. The counters are wiped down. The living room is straightened and vacuumed. The trash cans have been emptied. The bathrooms don’t have pee everywhere. You go to open the door to the refrigerator, and sitting on the sparkling clean shelf in the middle are ramekins filled with crème brulee, ready to be torched and eaten. The Cleaning Fairy visited during the night, just like she does every week.

WAKE UP!!!

Reality sets in. She didn’t come by and clean the house, de-clutter anything, and most certainly didn’t leave any crème brulee. Witch.

Instead, I have to do it. When the hubaroo gets off the phone with his mom and says he’d like to take the kids out for lunch and to hang out with her for a while- “Do you want to go?” HERE is the opportunity. A quiet house (well, until the 90’s booty-shakin’ music starts blasting when they leave) to really have the chance to get things done without distraction. NO, I do NOT want to go. Love the hubaroo, kids, and even the mother-in-law, but here’s the chance to wear myself out and be somewhat happy with the end result.

De-cluttering the house is a chore that most people dread doing, especially if you tend to hoard things that really have no business being in the house. Guilty!

It took reading a book that gave some true motivation to really get things in motion. Clutter’s Last Stand by Don Aslett got me on the wagon 9 years ago after reading it for the first time. It was on. Thirteen very large trash bags later, the house looked magical. This was B.C. (Before Children), so it was a LOT easier to maintain. The years dragged on, we got more crap, had two kids, got MORE crap, and here we are…with lots of crap.

Have you ever looked around your house and wanted to throw everything in the garbage can that was out of place? Yeah, that’s where I have been for the past month or so, but haven’t had the time (or energy) to light a fire under my butt and get things going.

So, here is the opportunity to get started. Christmas is a good motivator since there will be even more crap coming in the house when the fat man in red makes his delivery. We pay him with cookies and milk.

After going at it for a few hours and plopping down on the couch, I made a phone call to check on hubaroo and kids. After asking what he wanted for dinner, he said, “How about pizza? That’ll be simple. Oh, and some crème brulee.” You know, because pizza and crème brulee go together so well, right? (insert sarcasm here)

Since ordering pizza doesn’t take much effort, the crème brulee was definitely an option.

This and a glass of wine were my rewards for de-cluttering 10% of the house. A trip to Vegas after the whole thing is done will be sufficient. Or a new Mustang.

Since hubaroo was so gracious to remove our little freeloaders from the house for a few hours, I gave in to his dessert request. The best way to describe Crème Brulee is to call it French Pudding. Easy enough to explain that to people, and they’re more likely to eat it if they’ve never experienced the gloriousness of it before. And who doesn’t want to play with a kitchen torch?

What would you want as a reward for de-cluttering the house?

Crème Brulee Recipe

1 whole egg

4 egg yolks

1/2 cup granulated sugar

3 cups heavy cream

1 tablespoon triple sec

2 teaspoons pure vanilla extract

extra granulated sugar (for torching)

Preheat oven to 300 degrees. Whisk together the egg, yolks, and sugar in a medium size mixing bowl. Set aside. In a microwave safe container, heat the cream until hot but not boiling. Slowly pour a stream of the cream into the bowl with the egg, yolks, and sugar, constantly whisking. Whisk in the triple sec and vanilla. Pour liquid through a wire mesh strainer into another bowl with a spout.

Pour into 4 (8 oz.) shallow* ramekins. If you have smaller ramekins, you’ll have more servings. Place in a half sheet cake pan and pour hot water into pan (BE CAREFUL NOT TO GET WATER IN THE RAMEKINS, IT’LL RUIN THE CUSTARD). Very carefully place pan in the oven and bake for 40-50 minutes, just until the custards are set (and just a tiny bit jiggly). Remove pan from oven, use spatula to transfer ramekins to a cooling rack. When they are cooled completely, cover with plastic wrap and store in refrigerator for at least 4 hours before serving.

When torching for service, sprinkle about 1 tablespoon evenly on top of each custard. Torch the top using a kitchen torch.** Let set for about 1 minute before serving.

*Why shallow ramekins? The custard will cook more evenly in a shallow ramekin as opposed to a deeper one. The consistency will be the same throughout.

**I’ve heard some people say you can use the broiler in your oven if you don’t have a torch. It’s definitely not as effective as a kitchen torch, but is a way to improvise. Get yourself a kitchen torch though if you’d like, just keep it away from kids and pyromaniac husbands.


If I never see another skewer again, it’ll be too soon.

A friend from culinary school asked me to help her cater an event for her company Christmas party. Well duh! Happy to help, especially when a chunk of money is involved and it has anything to do with food.

We went over the details, and I agreed to do the desserts for the event. How about some cupcakes? Easy enough.

Then I found out the number. There were two events, 100 people at each event. Had to punch that one in the calculator for it to sink in that I was going to be making over 200 cupcakes and 2 decorated casino-themed cakes. She also needed as much help as I could provide with assembling appetizers. Sounded good to me, especially since I don’t get to see her as often as I’d like.

I started making the cupcakes two days before the event to make sure I wouldn’t be running around like a chicken with my head cut off. When I got home from my job as a pastry chef (making desserts all day), the cupcake baking began. You know, because I don’t already do enough baking at work (insert sarcasm here).

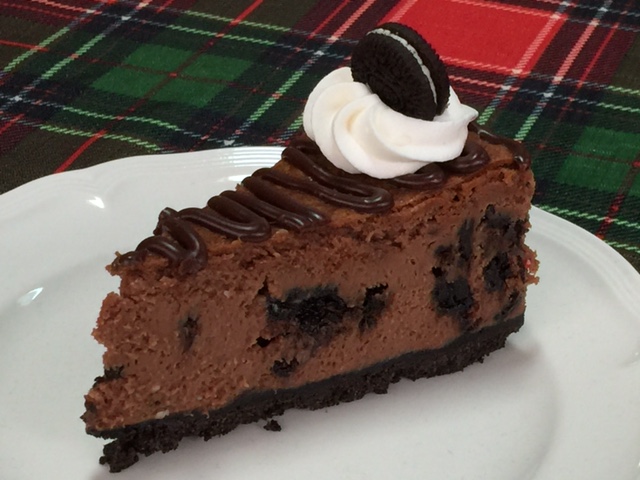
Got started on the three different flavors of cupcakes. Chocolate Peanut Butter (rich chocolate cupcakes with peanut butter chips, topped with peanut butter icing and chocolate ganache), Cookies ‘n Cream (vanilla cupcakes packed with chunks of Oreo cookies, topped with buttercream icing infused with Oreo cookie crumbs and a cute little mini Oreo on top of that), and Red Velvet cupcakes with cream cheese icing. By the day of the event, there were 204 cupcakes stacked on my kitchen island. “I’m really looking forward to those cupcakes leaving the house,” my husband said. He’s a neat freak, and doesn’t like to see stuff piled ANYWHERE. Best part about that is he actually cleans, and does a much better job than I do. Yes, he’s a unicorn husband.

The morning of the event, I was running around the house like a crazed maniac. Three different types of icing had to be made and piped on top of each of the 204 cupcakes. If there was a fly on the wall, it heard a lot of self-talk, a flash of a person running through the house, and maybe even some inappropriate language. The sweat was building up first thing in the morning before I even got started on all the skewered appetizers for everyone.

transportation

It’s a really good thing I gave in to buying a minivan, because it’s very unlikely all of this would have fit into a Mustang.

When I got to the location, my friend was already there working her butt off. I jumped in, and she put me on skewer duty.

I have never seen so many skewers in my life.

Skewers are an awesome way to serve appetizers. They’re pretty, you can assemble different items on them, and they’re easy for people to grab and eat.

img_4362

First were the salad skewers. I cut up six heads of lettuce into equal portions, “tried” to keep them somewhat stacked together for ease of assembling the skewers (and failed miserably at this). Next was slicing up the cooked bacon she prepared, then washing the little cherry tomatoes. I sat down and got to work.

After thirty minutes of assembling these little suckers, I was already mentally done… although there were at least 50 empty skewers left. Help me. “Oh my God, this is SUCH a pain in the butt. Tell boss lady that these shouldn’t be on the menu next year unless she wants to assemble them herself.” When I FINALLY finished those, she brought me the other items to go on the next skewer set. Yay.

img_4361

These skewers were colorful. Each one had:  green olive, roasted red bell pepper, mozzarella cheese cube, basil leaf, tortellini, salami, cherry tomato, and black olive. My hands smells like roasted red bell peppers after assembling 100 of these. I was okay with that.

img_4359

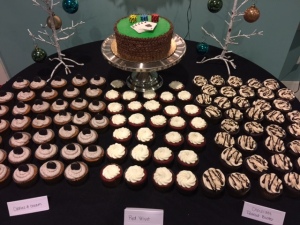
Once these were finally finished, it was time to put together the dessert table. The smell of sugar, peanut butter, chocolate, and cream cheese radiated through my nostrils as I was very carefully handling the precious cargo, unloading them from containers to the table.

After spending almost 6 hours of preparing these little demon skewers and all other prep to have everything together for the party, I was ready for a cocktail. Fortunately I was meeting up with some ladies from my neighborhood for a girls’ night out. After changing into something that didn’t smell like roasted red bell peppers (again that’s not a bad thing), I headed to the restaurant.

A few of them were already there waiting at the table, and I plopped down in my chair. The waiter walked up and asked, “Can I get you something to d-” and I cut him off with, “Apple Martini, please. Pronto.”

I drifted off into a deep sleep that night, dreaming of martinis and sugar. The demon skewers made their way into my dreams as well, trying to stab me with their sharp little pointers.

fullsizerender

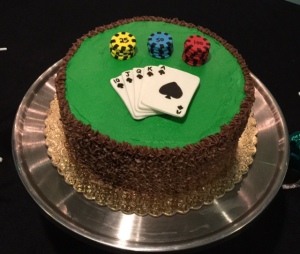
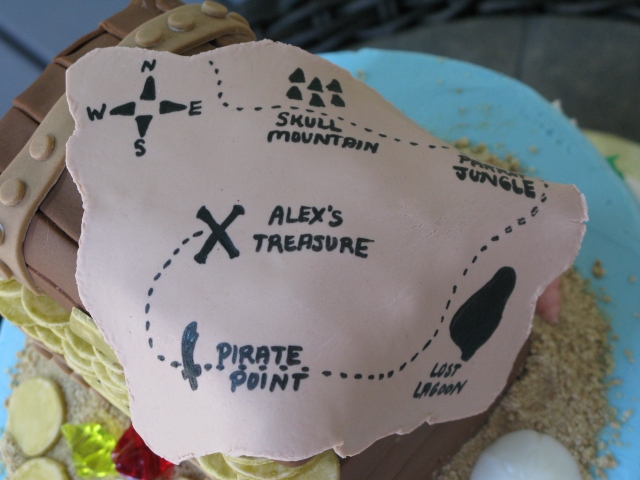
In the morning, I reached for my phone and saw a text from my friend that I worked with the night before. Someone stole the poker cake. STOLE. THE. CAKE. Laughter escaped my throat as I read this message. I’ve heard that imitation is the sincerest form of flattery, but how about robbery? Clearly the cake wouldn’t have been stolen if it were ugly, right? Just agree with me here, that’s the logic I’m sticking to on this.

Have you had the pleasure of assembling skewered appetizers for a party?


SECOND COOKBOOK AVAILABLE!!!

erin-courtney-whats-for-dinner-final-box-fix-small

My second cookbook in the Moms on the Go cookbook series is now available!

Are you tired of making the same things for dinner over and over again? Are you looking for easy recipes using every day ingredients? Look no further!

The Moms on the Go cookbook series is aimed at busy moms (and dads!) who are looking for simple and delicious recipes to prepare for their family. Even if you don’t have kids, these recipes are too simple and yumdiddles to pass up!

“What’s for Dinner?” is the second cookbook in this series with over 85 easy recipes for:  breakfast & brunch, salads & sandwiches, entrees (chicken, beef & pork, vegetarian), side dishes, and desserts!

Click HERE to get your copy!

Banana Blueberry Muffins

IMG_0290

Nothing screams breakfast like a fluffy muffin with a hot cup of coffee. Make your coworkers jealous when they see you bite into this pure deliciousness. The way to win someone’s heart is through muffins…at least at the office.

1 1/2 cups all purpose flour

3/4 cup granulated sugar

1 teaspoon baking powder

1 teaspoon baking soda

1/2 teaspoon salt

3 ripe bananas

1 egg

1 teaspoon vanilla

3 tablespoons butter, melted

3.5 oz. can blueberries, rinsed and drained*

Preheat oven to 350 degrees. In a medium size mixing bowl, combine flour, sugar, baking powder, baking soda, and salt. Whisk together. Combine bananas, egg, and vanilla in a blender, puree until smooth. Pour banana mixture into mixing bowl with dry ingredients, stir to combine. Add melted butter, stir again. Gently stir in blueberries. Coat each cavity of a standard muffin pan with cooking spray. Evenly distribute batter between each cavity in pan (will fill up about 3/4 full in each one). Sprinkle tops with about 1/4 teaspoon of sugar on each one. Bake for about 23 minutes, until golden brown. Remove pan from oven, let muffins cool slightly and transfer to cooling rack.

*You can use 1/2 cup fresh or frozen blueberries instead of can if you feel like gettin’ fancy. I personally prefer the little blueberries, but some people like the big ole fat ones. Personal preference takes the cake.

**These can be frozen! After muffins have cooled completely, individually wrap each one with plastic wrap, place in freezer bag and store in freezer. Grab one on your way out the door to work to enjoy a homemade muffin with your coffee. You deserve it.


Tiramisu Pancake Stack

It’s amazing how a simple combination of several different ingredients can make your mouth water just by thinking about them. My mother-in-law is a HUGE fan of tiramisu, and while I was making pancakes for the family one morning, her mere presence had me brainstorming about tiramisu recipes. The thoughts came swirling into my head like an ocean of chocolate syrup, and it was like a huge lightbulb turned on over my chocolate-syrup-filled brain. I gasped, then started thinking about how I could make these already delicious buttermilk pancakes, but brush each one with coffee, layer them with a mascarpone cream filling and top them with chocolate syrup. I’ll accept hugs as a thank you.

tiramisu pancake stack

I couldn’t wait to try these out, and thought about how perfectly a mimosa would accompany this as brunch. If you want to get technical about what is classified as a stack, of course it’ll be anything more than one pancake and cream layer…but feel free to go ahead and make a triple-decker. It’s worth it.

Oh, and did I mention this recipe will be in my upcoming book, “What’s For Dinner?” It’s the second book in my Moms On The Go cookbook series, and will have over 100 recipes for breakfast & brunch, soups, salads & sandwiches, entrees (chicken, beef, pork, & vegetarian), side dishes, and desserts.

Click HERE to check out my current cookbook available on Amazon!

For the Pancakes:

1 1/4 cups all-purpose flour

2 tablespoons granulated sugar

1 teaspoon baking powder

1/2 teaspoon baking soda

1/2 teaspoon salt

1 egg, beaten

2 tablespoons butter, melted

1 teaspoon vanilla

1 cup buttermilk

In a medium mixing bowl, whisk together flour, sugar, baking powder, baking soda, and salt. Add liquid ingredients, whisk together just until mixture is combined (batter will still have a few lumps). Heat a large skillet over medium heat. Pour 1/4 cup of batter at a time onto the skillet, and cook until bubbles appear on the surface. Flip with a spatula, and cook until lightly browned on the other side. Let pancakes cool to room temperature before assembling.

For the Cream Filling:

8 oz. mascarpone cheese

8 oz. frozen whipped topping, thawed

2 tablespoons confectioners sugar

In a small mixing bowl, combine all ingredients and beat at medium speed with electric mixer for about 1 minute.

Putting it all together:

Lay pancake on a plate, brush with cooled coffee. Spread 1/4 cup cream on top of pancake. Layer two more times, then top with chocolate syrup.

My First Cookbook!!!

I would apologize for all the exclamation points, but I can’t help it!  My first cookbook is now available!  This is the first book in the series Moms on the Go, and the book is titled “Party Time!”

This book is a compilation of simple and delicious foods that are perfect for parties.  They include:  hot appetizers, cold appetizers, beverages (both kid-friendly and adult), self-serve desserts and crowd pleasing desserts!

Click HERE for the link!  It’s available exclusively on Amazon!


Pirate Birthday Party

Click HERE to watch the slideshow!

It’s hard to believe our son turned a year old, but I was prepared to throw him a pirate party.  Every time my husband would pick on me for going “overboard” (ha ha, get it?), I would scoff at him and say, “He’ll remember this party for the rest of his life!”

Since a baby’s first birthday party is more for the adults and older kids than the birthday baby himself, it gives me an excuse to throw a blowout of a party.  First, the construction of the cake.  It had to be good.  It had to be massive.  It had to be amazing.

IMG_6672

Two weeks before the party, I got started on the cake topper, which was a treasure chest made out of rice krispie treats.  I bought a box of 16 treats, then put them all together to start the construction.  Here is the base and the top.

IMG_6674

After they were put together, I slathered some icing all around the sides and top.  The brown fondant was rolled out using a fondant roller, then cut into strips and wrapped around the treats to give it a real look of wooden planks.  The only thing I would do differently with this is use chocolate icing as a base, so there wouldn’t be any white specs of the buttercream underneath the fondant.

IMG_6690

The gold coins were made out of fondant as well.  I rolled out white fondant, using a small circle cutter to cut out the shapes, then painted them with gold food coloring.  This took several coats.  After the coins dried completely (couple of days), I layered them on top of the treats.  Skewers were cut to fit, and placed horizontally through the top section of the treats to secure them together.  More icing was piled on top and smoothed for a rounded look, then covered with the strips of fondant.  Toothpicks were stuck in the back side of the base of the chest, then the top part of the chest was placed on top of the toothpicks and coins.  The toothpicks secured the top part to the bottom.  The chest was placed on a small cake board, then cut to fit.  Dowel rods were placed in the top tier of the cake to prevent the chest from sinking into it (that thing was pretty heavy when finished).  Graham cracker crumbs were used as “sand” and the seashells were made out of chocolate using a seashell mold.  The jewels are plastic, and I used the majority of the jewels in the package for making treasure bags (along with plastic gold coins, plastic jewel rings, beads, and candy).  The treat bags were hidden in the back yard for the kids to do a treasure hunt, which they loved!

IMG_6691

The treasure map on top of the chest is also made out of fondant.  I rolled out the fondant, then cut it to shape using a paring knife.  An edible black pen was used to draw on it.

IMG_6686

Finished cake!  It literally weighed over 40 pounds…so it was transferred from one place to another only for pictures.  The bottom tier is a 3 layer 12 inch cake, and the top tier is a 4 layer 10 inch cake, the entire cake is vanilla with buttercream icing.

IMG_6693

The pirate skull, 1, anchors, and sharks are all made out of chocolate, using chocolate molds.  The red stripes and black cannon balls on the bottom tier are fondant.  The decorations on the top tier for the ocean are buttercream icing.

baby cake

Here is our little pirate, digging into his smash cake.  It was a 4 inch cake covered with buttercream and chocolate icing.  Go ahead and take a bite, big guy.  It’s your day.

IMG_6698

And, here we are with the pirate ship cake pops.  When I originally saw these, I got all excited and just HAD to make them…but wanted to add a little more than the original image I found, which only had the red and white stripe sails.  We went to our local arts and crafts store, which is where I found the card stock red and white stripe paper, along with black paper and the skull and crossbones stickers.  The cake pops are chocolate, covered with milk chocolate.  None of these were left at the end of the party.

2016-02-22 10.17.40

Speaking of chocolate, how about some chocolate lollipops?  I started working on these a week before the party.  Since there were several different colors of chocolate, it was more time consuming than just using one solid color.  I melted the different colors of chocolate separately, and used a toothpick to detail the colors, setting the molds in the refrigerator for the chocolate to set in between each color.  Time consuming, but worth it in my opinion.

Alex is 1-0356

Here’s the dessert table, which also had chocolate chip cookies (made small and thick to look like gold nuggets), and peanut butter ritz cookies made with yellow chocolate to resemble gold coins.

IMG_6676

Oh, and while we were at the arts and crafts store, silly me made the mistake of walking past the bird houses and came across this one.  It ended up in my cart, along with paint brushes and paint.

FullSizeRender

I was very happy with how it turned out, and used it as a table centerpiece for the party.  We’ll put it up in the yard since the party has passed for our visual enjoyment to watch the pirate birds play in their new pirate ship house.

12744645_10153934731162288_8523827432841632933_n[1]

Here was our menu for the party.  I decided to print out copies and place them around the house so I didn’t have to repeat myself 20 times going over everything there was to eat. Almost all of the food items served at the party are included in my upcoming cookbook!

IMG_3458

The photo prop was bought for pictures like these.

IMG_6700

And who doesn’t love an inflatable pirate?

family pic

It’s not a pirate party if you’re not dressed as a pirate, right?  Exactly!  ARRRRGH!!!

Gingerbread Rice Krispie Treats

While strolling through Wal Mart, the holiday baking section always catches my eye this time of year.  Well, I say that I was strolling, but it was more along the lines of a race-walking situation where I was headed for the finish line (being checkout).  I slowed down for a few seconds, then came to a screeching halt.  There they were…practically taunting me from the shelf…Gingerbread Marshmallows.  Was this an oasis in the dessert of shopping craziness in front of my eyes?  Clearly it was, so two bags were quickly thrown into my cart.  On I went, bolting for the self checkout aisle.  I couldn’t help but to fantasize about how satisfying some Gingerbread Rice Krispie Treats would be going into my belly.

With previous Rice Krispie Treat recipes, I’ve noticed that they’ve seemed a little dry.  Since I’m a huge fan of delicious desserts with moisture, I usually add a little more butter than what the recipe calls for…and in this case, some added cinnamon.  You’re welcome.

gingerbread rice krispie treats 1

Gingerbread Rice Krispie Treats Recipe

4 tablespoons butter

1 teaspoon cinnamon

1 (8 oz.) bag gingerbread marshmallows

5 cups Rice Krispies cereal

extra butter for dish

Generously rub extra butter in bottom an dup sides of a 9×13 inch baking dish, set aside.  In a large pot, melt butter on low/medium heat on stove.  Continue to cook butter, stirring constantly, until slightly browned.  Stir in cinnamon and continue to cook for another minute.  Add marshmallows, reduce heat and stir constantly until marshmallows are melted and mixture is smooth.  Remove front heat, immediately add cereal and stir well until mixture is completely coated.  Spoon mixture into buttered dish.  Use extra butter for rubbing on hands, then press mixture evenly into dish.

Baked Pumpkin Donuts

Over the weekend, we were stuck inside the house due to inclement weather.  I’ve been hearing the buzz of other people talking about pumpkin donuts from different donut shops…but since driving wasn’t the greatest idea, I decided to make some at home.  Biting into that fluffy, flavorful donut and sipping some hot coffee, it did add some brightness to our cabin fever filled days.

pumpkin donuts

For The Donuts

1 1/2 cups all purpose flour

1/2 cup packed light brown sugar

1 1/2 teaspoons baking powder

1 teaspoon cinnamon

1/2 teaspoon nutmeg

1/2 teaspoon salt

1/4 teaspoon baking soda

1 cup pureed pumpkin

2 eggs

1/4 cup butter, softened

1/4 cup milk

Preheat oven to 325 degrees.  In a medium size mixing bowl, combine flour, sugar, baking powder, cinnamon, nutmeg, salt and baking soda, whisk together.  Add pumpkin, eggs, milk and butter.  Using an electric mixer, beat at medium speed for about 2 minutes, just until well combined.  Grease and flour a donut pan.  Spoon batter into a large pastry bag, cut about 1 inch off the tip of the pastry bag.  Pipe batter into donut pan, then place in oven and bake for 8-10 minutes (or until donut springs back lightly when touched).    Remove from oven and turn donuts out of pan onto a parchment paper lined cookie sheet.  Dip each donut in glaze, return to parchment paper to cool.

For The Glaze

3 cups powdered sugar

1/4 cup butter, melted

2 teaspoons vanilla

2 tablespoons water

In a small mixing bowl, combine all ingredients and stir well.

Frozen Birthday Cake

Frozen…the movie that literally every mom knows.  In fact, I bet every mom knows every single word to the song “Let It Go.”  Backwards.  Maybe even in Chinese.  I’ve gone as far as getting the sheet music and downloading background music to play it on my flute.  The things we do for our children.

2015-08-09 10.50.50

Our daughter turned 5, and she’s been talking about her Frozen birthday cake and party for the last several months, so I knew it had to be something good.

2015-08-09 10.51.01

“Frozen” is a frozen buttercream transfer.  The snowflakes are made out of fondant, a variety of different shades of blue and cut out with a snowflake cutter.  I rolled out the fondant and cut the snowflakes out several days before putting the cake together so the snowflakes could harden.  I watched this video to learn how to do a frozen buttercream transfer.

2015-08-09 10.54.19

The 5 is made out of chocolate using a chocolate mold.  The “ice” is made out of hard candy (see recipe below), and the cake toppers were purchased from Amazon.  In all honesty, you can use any figurines you please for placing items on a cake for decoration, just make sure they’re nice and clean before placing them on the cake.  Nobody wants cooties.

2015-08-09 10.55.13

The cake was a 10 inch 4 layer white almond cake with buttercream icing…and I’ll have to say it was a big hit.  There’s nothing like having a Frozen birthday pool party in August.

Hard Candy Recipe

3/4 cup white sugar

1 1/2 cups corn syrup

1 cup water

1 tablespoon extract (or candy flavoring)

food coloring (takes very little, 1 drop of sky blue recommended for this)

In a medium sauce pan, combine sugar, corn syrup and water, cook on medium heat, stirring until sugar is dissolved.  Turn heat to high, do not stir, and wait until mixture reaches between 300-310 degrees.  Candy thermometer (digital thermometer is fine) is a must for this.  When mixture reaches desired temperature, remove from heat and stir in flavoring and coloring.  Spray a cookie sheet with butter spray, spread candy mixture out into a thin layer.  Let set to cool and harden, break into shards and place on cake.